Our first veggie garden
Hallie Moore Guest Blogger 2010
Welcome new Burpee Home Gardens blogger Hallie Moore! She will be gardening with Burpee vegetables and herbs this season and sharing her story with you!
This past weekend Chase and I set out to create our very first veggie garden. It was the next step in making our first house our first home. After seeing some of our friends start their gardens, we had been talking about starting up one of our own. It just so happened that Burpee Home Gardens was the push we needed. After being contacted by Burpee and asked if we would be willing to document our gardening adventures for the masses we decided, yep, its a sign. Let the gardening begin.
We were in the midst of a backyard makeover when the opportunity arose so we knew it would be a great time. The next major decision was where to put the garden. At the time, our backyard was mostly shade and the two beds had already been made over with shrubs and flowers so we were a little unsure about where to put our veggies. We ended up deciding on a little bed area near our garage that was totally overgrown. It didn’t get a ton of sun, but we knew after we had all of our trees cut back it would be a perfect location. So, location for our new garden, check.
 The next decision was how did we want to plant them. I had read a little about square foot gardening and box planting, and a friend of mine had recently chosen that route. I thought it was a good combination of blending into a bed but have the garden stand out separate from the rest of our landscape. How to plant, check.
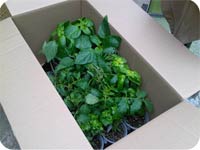
Now that all the major decisions had been made, we patiently awaited the delivery of our plants from Burpee. We were getting very excited to tackle the project (or I was excited and Chase was playing along). And then they arrived!! A big box of “Live Plants.”
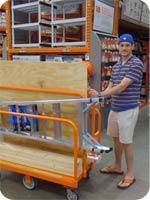
Let the actual project begin. We headed to Home Depot to get the supplies we needed. Since we decided on a box for the veggies, we had to purchase two 2x6x8 boards that we cut in half, and a piece of plywood cut to 4x4 for the bottom of the box. Also on our list was a couple bags of veggie planting soil and a couple bags of organic compost.
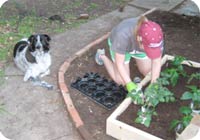 The first step was to create our box and clean out the bed. Chase quickly assembled the box while I pulled weeds and grass to create the area for the veggies. The box was easy to create; all he had to do was nail the four 4 ft. pieces of 2x6 to form a box and then nail the piece of plywood to the bottom. After attaching the plywood to the bottom, he drilled eight holes for drainage.
We put the box in the area we had decided for the garden and adjusted so it was just how we wanted it. After the box was in place, we loaded our bags of soil and compost, mixed them up, and evened it out so it was ready for the plants.
Finally, lets get those plants in there. We positioned all of the tomatoes and basil plants in the box to make sure it would fit and each plant had enough room and then I started planting. It was starting to look like a real veggie garden!
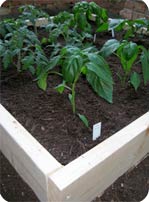 Now we wait and water and wait and water. Hopefully something will produce! We can’t wait to eat tomatoes from our very own backyard!