Skip to content
opens in a new window

Blog

May 16, 2011
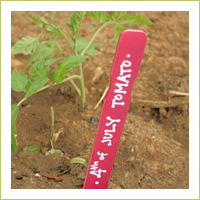
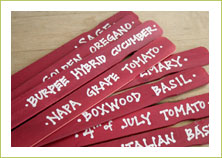
Colorful plant labels
Susan Whetzel  Burpee Home Gardens Guest Blogger | Recipe Developer

So…who’s planted their garden?

Anyone?

We’ve had ours out for roughly a week, in part due to the weeks of nice sunny weather and lots of rain, which greened up our lawn to the point that it requires mowing twice a week.

Ugh.

But, as soon as we got the plants in the ground – last night we had a frost warning. Frost. Luckily I have a garden-dedicated man in the house, who went out after midnight and covered all the little babies up with tarps. I, of course, was tucked away in a nice warm bed, completely oblivious.

I prefer it that way.

What I don’t like being oblivious about, however, is what is planted where. Honestly, I forget what’s what. I am adept enough to recognize a tomato plant versus a melon or zucchini plant. But we like to plant unusual varieties and types, and it isn’t easy to remember all of the differences. So…what to do?

Label them.

Since I am writing for Burpee Home Gardens this year, I want to keep the garden looking sharp. So, the little labels that come attached to the plants just weren’t going to cut it. That, and I am a sucker for labels that are all matchy matchy.

Thanks to a successful shout out on Twitter, I was pointed to a website where the clever gal had made some really cute ones on the cheap.

I like cheap.

Now, hers are a little more colorful than mine, but I intend to do more of them in other shades. I just wanted to share what I did and how, so that if any of you are in the midst of planting, you can whip up a few to mark your plants as well. We can’t have you confusing your Boxwood Basil with your eggplants.

Not that you would.

Garden Stake Recipe

  • Wooden Paint Stirrers
  • Spray Paint
  • Paint Marker
  • Spray Varnish

First, flirt with the paint guy at Home Depot and secure a good amount of free paint stirrers. You’ll need several. Once you get them home, lay them out on a newspaper or a cardboard box, and proceed to spray them with a coat of paint. We used a dark raspberry. Had I known how cute they would turn out, I’d have bought additional colors. Lucky for me, I have a ton more to make.

Allow the first coat of paint to dry 30-45 minutes, and then spray the opposite side. You can, of course, spray 2 coats on each side, but, in my opinion, rustic works. Once they are dry, use a paint pen, available in the craft section of Walmart or at Michaels. Decide what to write on each, and do it. I prefer all caps, with little dots on the end of each letter, just because it looks like the things you buy at them mall when you are 12 and want your name written on everything you own.

Maybe that was just me.

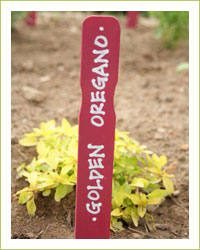
From there, spray a coat of varnish over the stake and allow to dry. Finally, place it in the garden.

Voila! You’re done!

I love the way these look, and I really like how large they are and how easy it is to read them. Hopefully you can use this idea, too!

Happy planting!

Reader Comments (15)
I love these and if I had more planted than I do...I would surely do these!! Another idea for Moms would be to give these sticks to the kids, give them a list of the plants and let them go for it!! I know my kids would love to do it if I asked um!!
Monday, May 16, 2011 | Deana Smith
These are wonderful, and easy to spot. Our garden isn't quite in yet, so i have time to make some before i forget what was planted where! Thanks!
Monday, May 16, 2011 | christina
We are kind of slow in planting our stuff this year, but this is definitely an awesome and adorably cute idea. :)
Monday, May 16, 2011 | Misty
What a great weekend activity to do with the kiddos- crafts, while discussing healthy food options by growing our own veggies!
Monday, May 16, 2011 | KitchenRx
Love, love, love this idea!!! Def. keeping this idea for next yrs garden! No more memory game until everything pops up, thanks!!!
Monday, May 16, 2011 | Laura
I am going to have to find some paint sticks! Hoping to plant my garden this week!
Monday, May 16, 2011 | Jessie
Great idea!
Monday, May 16, 2011 | Amy
this is a fabulous idea - you could make them really artsy if you wanted - or whimsical ... I wish I had a garden to use them in!
Monday, May 16, 2011 | Doreen
Very cute stakes! I haven't planted anything yet since the weather has been on the chilly side at night still.
Monday, May 16, 2011 | Jersey Girl Cooks
So cute! I love your blog...how did you get to be writing for Burpee? So neat, this was a really fun post
Monday, May 16, 2011 | Jakenkait
Love the idea! And that they will be big enough to read when my plants grow!
Monday, May 16, 2011 | Tina Reedy
Loved this, I guess my comment last week was on your blog not here. We finally got one garden planted this weekend, and I was able to get 10 paint sticks each from both Lowes & Home Depot, I'll probably try going to another one tomorrow so I know I have enough. I haven't painted them yet, but will by this weekend.
Monday, May 16, 2011 | Michele N
What a great and super cute idea! I always forget what's what this would help.
Monday, May 16, 2011 | Miss
Love this idea! Michael helps me plant everything, but then he often can't tell what's a weed vs something we actually want to keep and eat. We have a bunch of small plant markers, but this is so much better.
Tuesday, May 17, 2011 | Andrea Meyers
Thanks for the "Great Idea." Every year, I am in my local "Garden Walk." There are so many people that ask "What is That Plant Called?" This would be a great way to label the plants. I like that the paint sticks are large enough, to make it easy for all to read without straining their eyes. Also, the little girls next door and their friends also ask about the plants. What a great way to teach the younger generation about "The Love of Gardening." <3
Monday, June 13, 2011 | Mary Ann
Post a New Comment

Author:

Comment:


Click to confirm:

NOTE: Comments are moderated